Here's all you need to get started:
 If you can read AND follow instructions, it's idiot proof.
The only brand that matters is the Mazola CORN oil. My friend who shared this recipe swears it makes a difference. Because her pies were inhaled, not chewed, I have never deviated from this detail. Do so at your own risk.
Now, pre-heat your oven to 350 and gather these ingredients:
1 cup + 2 Tblsp ALL PURPOSE flour
2 Tblsp. sugar
1/2 tsp. salt
1/3 cup Mazola Corn oil
2-3 Tblsp. ICE water (cold is supposed to matter, too)
In a small bowl, mix together all the dry ingredients. Make a "well" in the center and add the oil.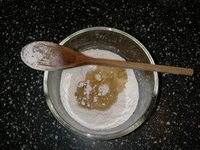 Next, with a spoon or pastry knife cut in the flour with the liquid.
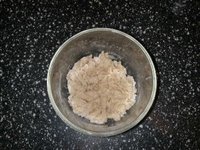
This is when I begin adding the ICE water; I usually start with 2 tablespoons, and then if it seems too dry, I had a third. Once it is mixed well by spoon, I fold it in with my hands (from the outside to the center). If it sticks to your hands, it is too wet, so add a bit of flour. Don't over-handle the dough. It should be smooth enough to shape it into a disc like this:
 Tear two sheets of waxed paper about 18" long. Put the dough-disc on top of one sheet and cover it with the other. Now the fun part.......start your rollin' :). Roll in opposing directions, with the obvious goal of shaping a circle (because you're limited by the width of your waxed paper, your circle will be more oblong...). I'm not sure about the thickness of your piecrust, but it's THIN...maybe 1/8". No worries, though.
 Once your circle/oblong is larger than your pie plate, you'll be ready to pick it up and drape it over your dish. Here's where the secret technique comes in. Slowly lift the top layer of wax paper completely off the crust. If it sticks, go slower. If it STILL sticks, start over. Lightly replace the top sheet of wax paper.
Pick up BOTH sheets of wax paper with the crust between them and flip it over to the other side.
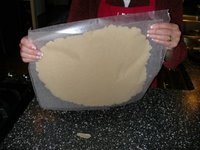 Now, lift what WAS the bottom layer of paper completely off. Ball it up and see if you can score two points by tossing it into the nearest trashcan. This step is not part of the secret technique but it conjures up all kinds of fun school-year memories of trashcan basketball:).
Carefully lift the crust by the wax paper underneath and drape it, centered, over your pie plate.
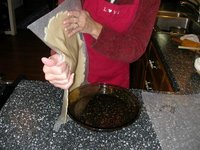 Now, slowly remove the wax paper; it should lift easily since you've already lifted it once before.
 For this demonstration pie, I've made an All-American Apple Pie. It also required a top crust, so I made two recipes. I have never doubled the recipe and divided the dough in half; instead, I've made two separate recipes in separate bowls. With the extra dough, I used some tiny cookie cutters to make apple designs (to hide the flaws :/). Be sure to "vent" the pie by cutting about 6-8 1" slits in the top...it might explode if you don't (I doubt that would actually happen, but do you really wanna find out?)
The top crust was a bit dry, I should've used a bit more ice water (hence, the flaws). A neat gizmo my mother-in-law gave me is this "pie crust saver". It really does its job--in the past, I'd cover the edges with tin foil for half the cooking time to keep the edges from getting darker than the center of the pie; that was a pain and usually resulted in me getting burned when I pulled it off. 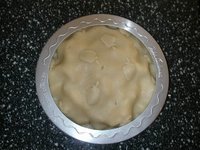 Here's the end result...and......yum! It's just as good as I remembered!
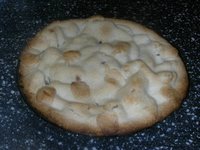 Lemme know if you try it or if it sounds like I've left something out. This is a recipe in the "oral tradition", that's why I provided the visuals :). In other words, I know what to do and I hope I'm remembering to tell you everything. Really. Truly. I wouldn't intentionally leave anything out, would I? Shame on YOU for even thinkin' it! ;)


 Name:
Name:


9 Comments:
Sounds fantastic! I'm quite impressed with the Martha Stewart play-by-play as well. I think we'll have to try this sometime in the next month.
I'm not being churlish, but I started a diet two weeks ago (not a real diet, just cutting out flour things; bread, pasta, pies) so I'll just look at the pictures.
PS. it might interest you to know that this showed up in Google feedreader, but not bloglines. I wonder if that's because blogger is a google product?
I am going to save this recipe, thanks for sharing your secret! looks nummy, and the apples are pretty.
Kelly, it can be Home Ec for the kids :).
Peter, churlish? Perish the thought! I'm on a real diet. If I sound testy, that just could be the reason why >:{.
Mert, I use Rome apples, and they're not in season that long...lemme know if/when you try it! (Nice new profile pic!) :)
bloglines still not working right for me.
I've used this or a similar recipe before, but I always go back to my old Good housekeeping recipe. And I use butter flavored crisco.
Hubby's gram used LARD - and thats what you get in most store bought brands.
Your pie looks lovely - I'm impressed with the cute little apples I never would have thought about patching with cut outs. Learn't something new!!!!!
Cute little apples on the top!!! Looks pretty easy and good - BUT - I'll stick with the Pillsbury brand, thanks!
Hey this looks delish and easy! I am gonna try it someday when I have a bit more time to bake. I will certainly let you know how it turns out.
how cool! I love that you gave the step-by-step with pictures!!!!
But, I'll stick with my good-old-fashioned-ask-my-m-i-l-stand-by ;)
This does sound yummy :)...I suppose you can make any fruit in this pie. My hubby does not like apple pie that much, but cherry pie :)...I might give a shot for Christmas.
Post a Comment
<< Home